Most homeowners rarely visit their attic. Unless they need to retrieve something, check a leak or let a contractor in, the space above their ceilings can go years without much attention. Changes in the roof sheathing may develop without anyone noticing.
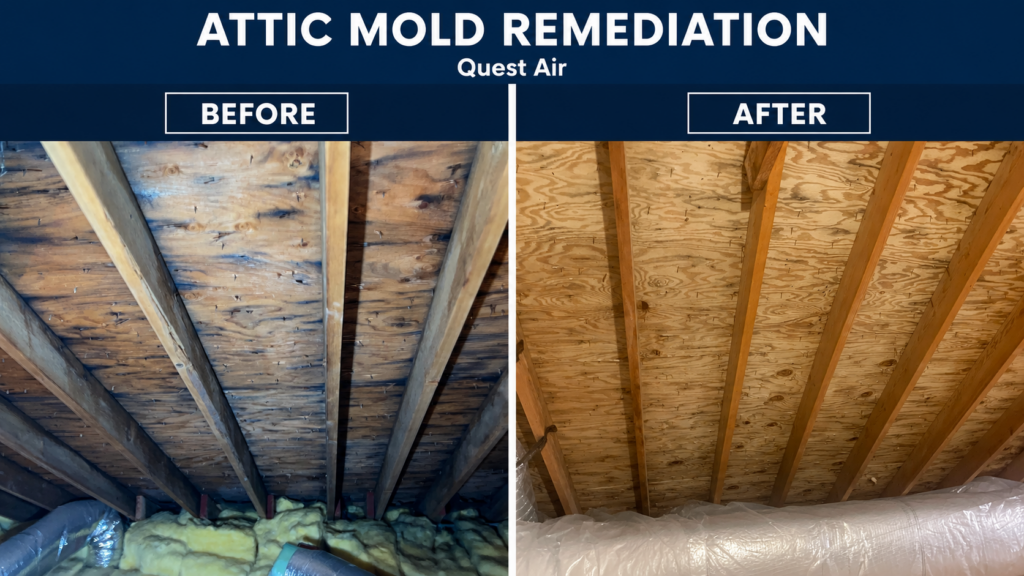
These attic photos show a noticeable difference in the appearance of the wood. One image shows dark discoloration across much of the plywood between the rafters. The other shows a lighter, more consistent surface, with the natural wood grain clearly visible.
For homeowners, that comparison raises a practical question: if your attic looks like the darker photo, what should you do next?
Understanding What You Are Seeing
Dark discoloration on attic wood deserves a closer look. However, the color of the wood alone does not tell the whole story. A photograph cannot confirm the type of mold, establish whether the material is currently damp or explain what caused the condition.
An assessment helps answer those questions. It gives homeowners a clearer understanding of the affected areas and what work may be needed. It also provides an opportunity to examine the surrounding conditions instead of focusing only on the most noticeable marks.
If you discover something concerning in your attic, document what you can see from a safe location. Note where the discoloration appears and whether you know of any previous leaks or moisture problems. That information can help guide the conversation when you contact a professional.
Why Moisture Matters
Addressing attic mold involves more than changing how the wood looks. The moisture that allowed the problem to develop needs attention as well.
The Environmental Protection Agency identifies moisture control as the key to mold control. Its guidance calls for cleaning up mold and correcting the water problem that contributed to its growth. www.epa.gov
For homeowners, this means asking two related questions: what needs to be addressed in the attic, and what allowed the condition to develop?
Those answers help shape the scope of the project. If repairs are needed beyond the remediation work, homeowners should understand what they involve and who will handle them. Having that conversation early makes it easier to coordinate the work and understand the full plan.
What the Photos Show
In the darker photograph, discoloration extends across multiple sections of roof sheathing. The marks appear throughout the photographed area rather than in one small, isolated spot.
The lighter photograph shows a visibly different surface. The plywood grain and knots are easier to see, and there is considerably less dark discoloration across the area shown.
Before and after photographs can provide a useful record of an attic project. They help homeowners see the areas addressed and give them something to keep with their paperwork.
Still, photographs have limits. Lighting, camera angles and the sections being photographed can affect how a comparison looks. Photos should support the explanation of the completed work, along with a clear description of what was done and how the results were evaluated.
What to Ask Before Attic Mold Remediation
You do not need to understand every technical term to have a useful conversation about your attic. Start with direct questions that help you understand the findings and the proposed work.
Ask which areas need attention and what the assessment revealed. Find out what work is included, whether any materials require further evaluation and what is known about the moisture source.
You should also understand how the project will be documented. Ask whether you will receive photographs, a written description of the work and any relevant completion records.
A clear scope helps everyone understand what is being addressed. If additional conditions are discovered during the project, ask how those findings affect the original plan. Knowing why a change is needed makes it easier to make an informed decision.
Keep Your Project Records Together
Attic work can be difficult for homeowners to review firsthand. Access may be limited, footing can be awkward and the affected surfaces are often overhead. Good documentation makes the project easier to understand without repeatedly entering the space.
Keep the assessment, written scope, photographs and completion records together. If related repairs are performed, save those records with the same paperwork.
When possible, before and after photos should show the same sections from similar positions. Wider images help establish where the work took place, while closer photographs can document individual areas.
Those records may be useful later when discussing the attic with another contractor or reviewing the history of the home. They also give you a reference if you notice a change in the future.
Understanding the Next Steps
Once work is complete, ask what follow-up is appropriate for your attic. Homeowners should know what conditions to watch for and whom to contact if concerns arise.
The goal is to leave you with a clear understanding of the project. You should know which areas were addressed, what related issues were identified and whether any additional work remains.
A lighter wood surface can make a striking photograph, but the explanation behind the work matters too. Understanding the scope and the moisture conditions gives homeowners a more complete picture of what their attic needs.
Contact Quest Air About Your Attic
If you have noticed dark discoloration on your attic roof sheathing, start by finding out what you are looking at. A professional assessment can help you understand the condition of the space and determine the appropriate next steps.
Contact Quest Air to discuss your attic mold concerns. Getting clear answers about the findings, proposed work and moisture conditions can help you move forward with a plan you understand.